Coastal DIY: Mid-Century Modern Address Sign
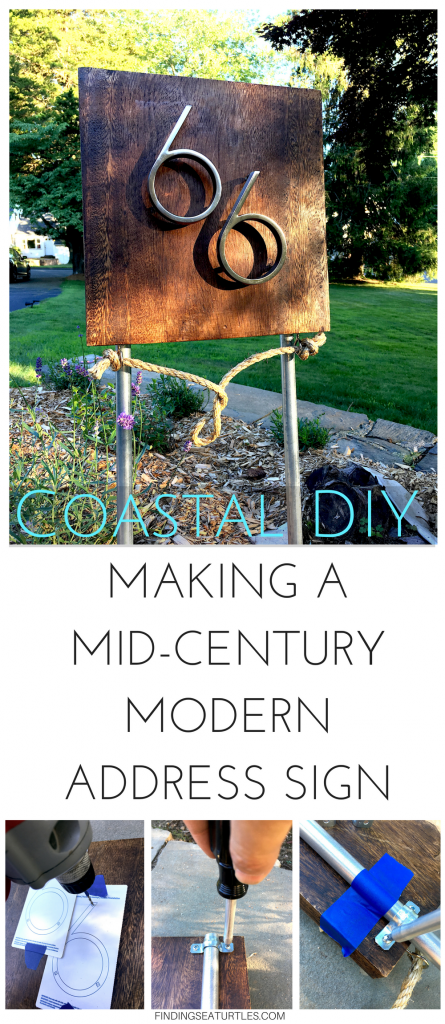
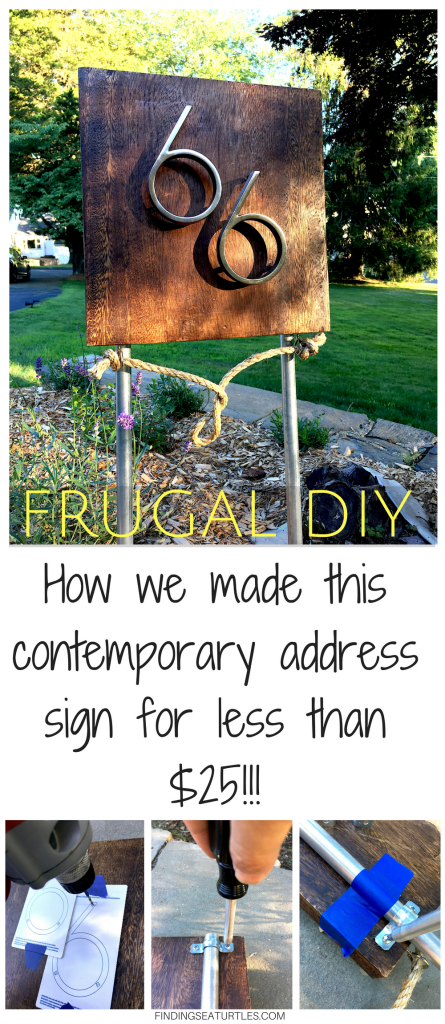

Building a Mid-Century Modern Nautical Address Sign on the Cheap
This article describes how we made our own DIY address sign in a Mid-Century Modern, Nautical style. Having a home in a coastal community, we wanted an address sign that had a slight nautical flair but still be more contemporary than farmhouse or traditional. We found several custom signs on Pinterest but even basic custom plaques can cost anywhere from $50 to over $100. We decided to build our own by ‘creative sourcing’ of parts to keep cost down, while achieving the look we wanted.
The overall look we were going for was a medium-brown stained wood background with silver (brushed, chrome or nickel of some sort) numbering. The font for the numbers needed to be more mid-century modern or art deco. We were hoping the combination would provide a more contemporary look. Many readily-available custom signs read more like traditional estate signs. We only needed two numbers, so the sign didn’t need to be that big. And we wanted to stake the sign at the end of our fairly long driveway. So we needed to incorporate some sort of staking system versus attaching directly to the house.
Sign Base
The original plan was to get some lightly figured 1″x3″ or 1″x4″, attach them together and stain and seal them for the base. Several designs we saw on Pinterest did this and while they looked ok, the wood people typically used were plywood or heavily grained and that made the signs look more rustic than modern. That being said, picking the right wood (with the right grain) for the job is critical when staining for whichever look you want. You can easily find your desired look with the wood readily available at Home Depot or Lowe’s. If you decide to paint the wood, then go with whatever is cheaper and strong enough to support your sign.
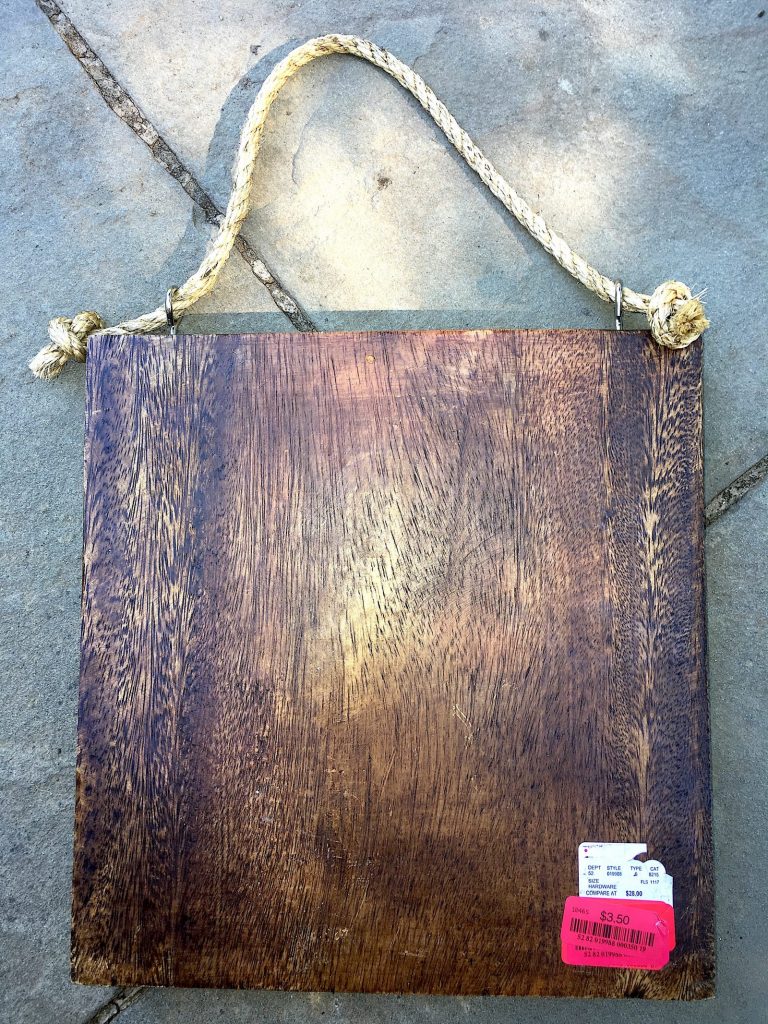
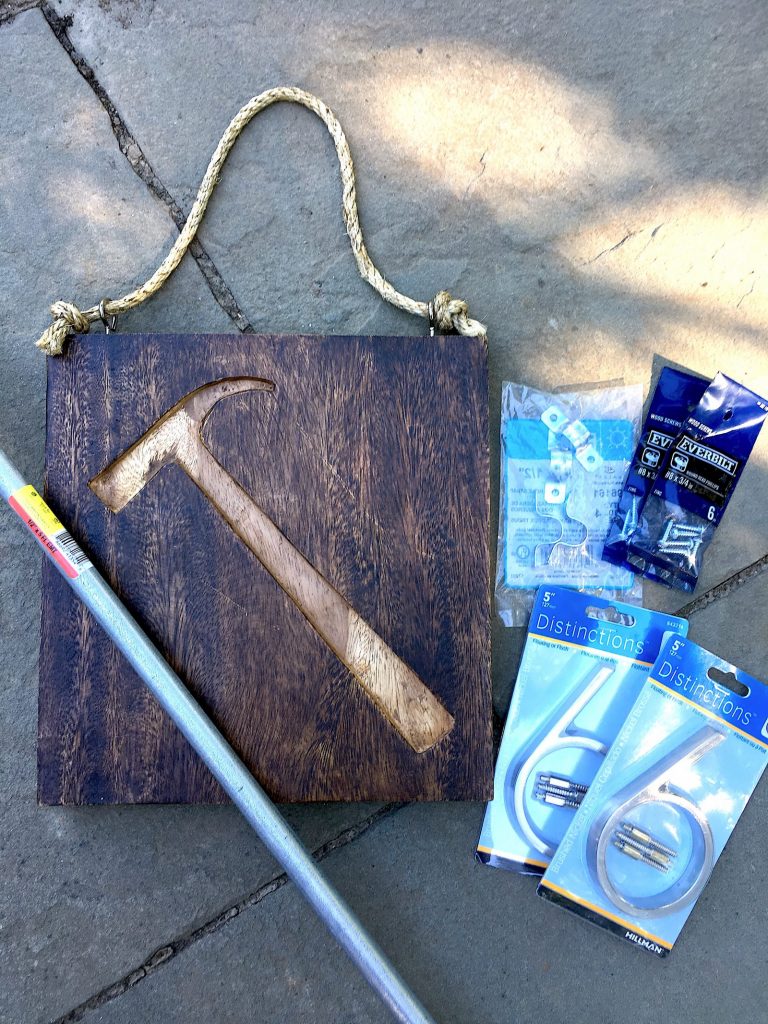
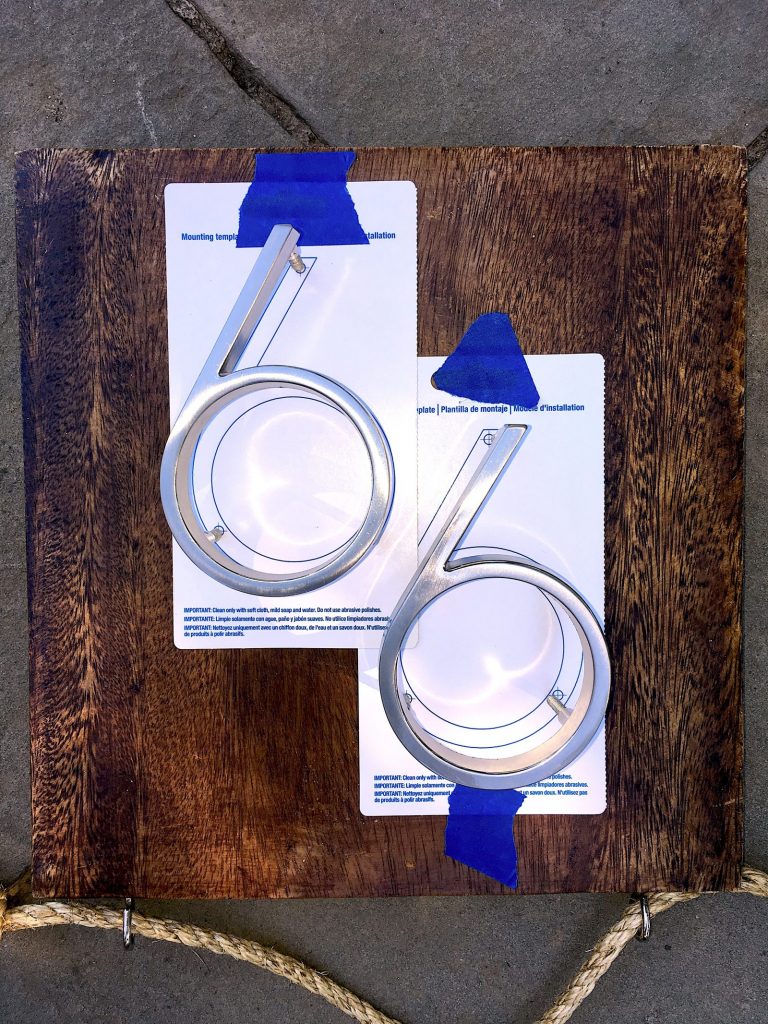
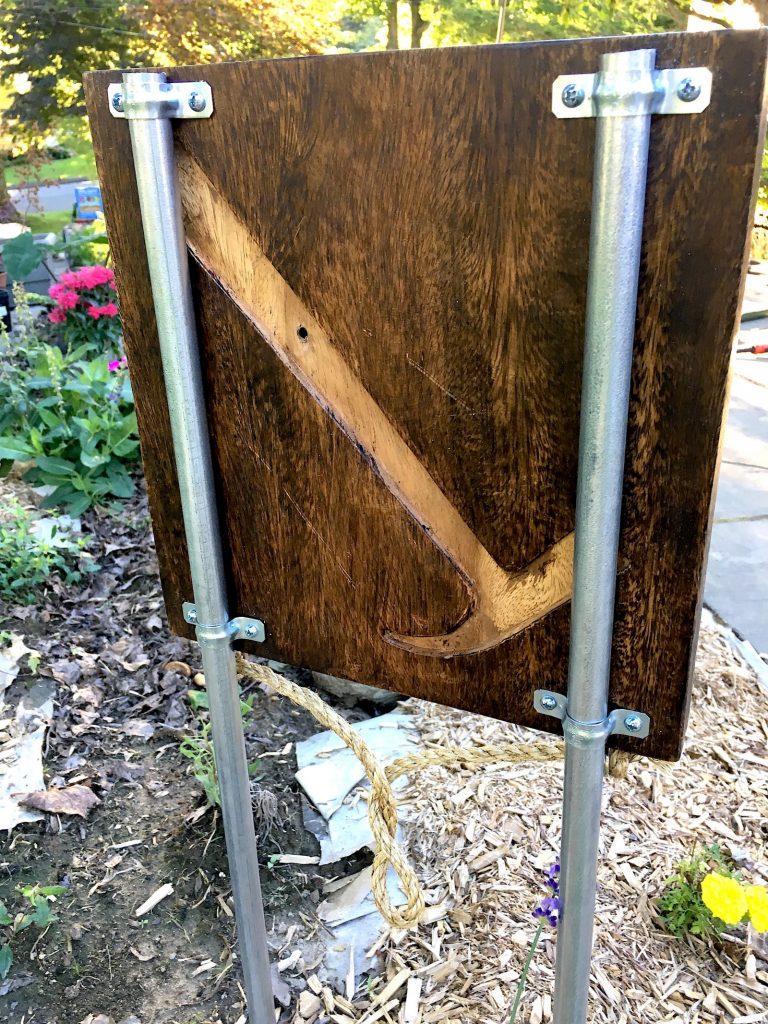
We ended up not building our own base because we sourced a ‘ready-made’ one by chance. As many know, Home Goods is a great place for very random finds. On a recent visit we stumbled across something in the ‘clearance section’ marked with their red price tags. It was this roughly 12″x12″ solid wood plaque nearly 2″ thick. It looks to be some tropical south east asian wood with a mild figure (wood grain) and stained in a nice medium walnut color very common amongst mid-century modern furniture. It wasn’t sealed but instead waxed, which should still make the wood relatively water-resistant (although only time will tell). Unfortunately the plaque was designed with a carved hammer relief into one side of the wood, I guess as some sort of workshop sign. It has two eye hooks with a sisal-type knotted rope to hang the sign. Here’s the shocker: it was marked down to only $3.50!! We couldn’t even buy raw wood for that cheap. So, we decided to try and fabricate something with the un-carved side of the board. Spoiler-alert: the sisal rope hanger turned out to be just the nautical touch we were looking for (without getting to kitschy).
House Numbers
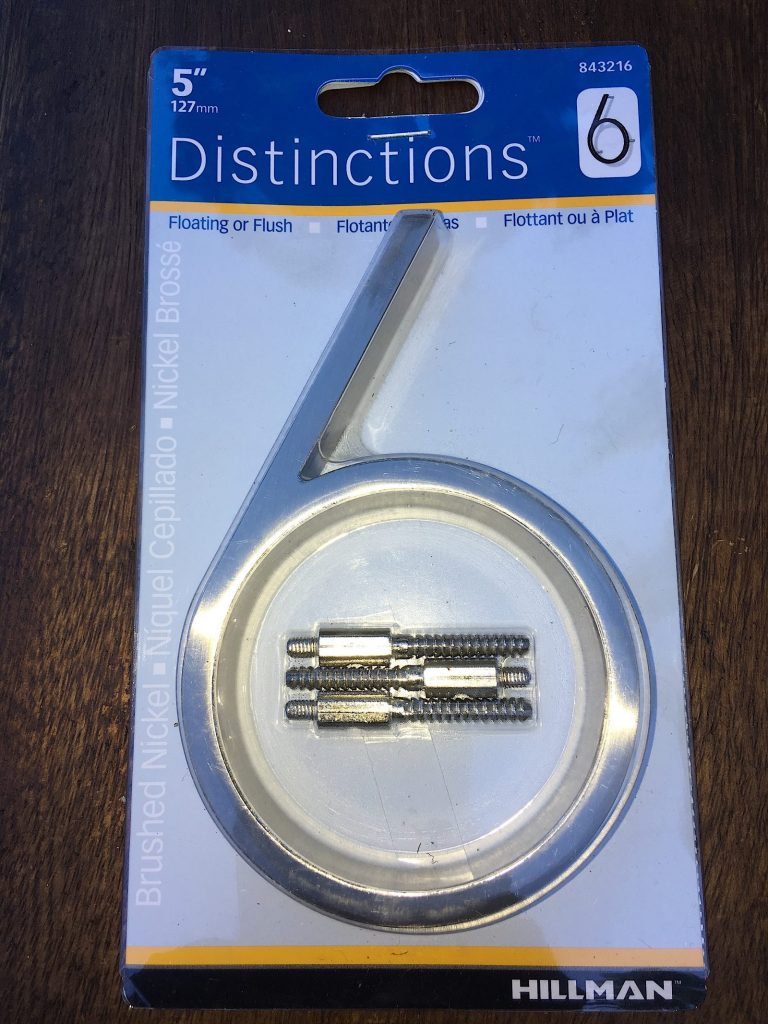
These were relatively easy to find but if you decide you want to do a larger sign with your street name on it as well, our research shows this style in lettering (metal, floating install, contemporary font) is harder to source. But for simple numbers, we found these at Home Depot (Lowe’s also sells something comparable) and at $5.99 each, were downright reasonable. Made by Hillman, they come in a contemporary font, large 5″ size so they are readable from the street, and mountable either flush to the surface or raised like we did. They are also stocked in black if that suits your needs.
Staking
There’s a lot of ways to stake the sign but some of the designs we saw and liked leverage some sort of metal tubing. The metal finish worked well with the brushed nickel of the numbers. You can easily modify this part of your sign with either simpler wood staking. Also, if you have a wider sign (e.g. longer house number) then you may need to improvise a bit from our approach.
Electrical metal conduit (EMT) is often repurposed in a lot of DIY and sure enough it works well with our sign project. We ended up going with 1/2″ EMT conduit (again, readily available in your Home Depot / Lowe’s store). The shortest length is a 5′ length which ended up being perfect for our sign. One simple cut and we had two 30″ lengths for the two posts we needed.
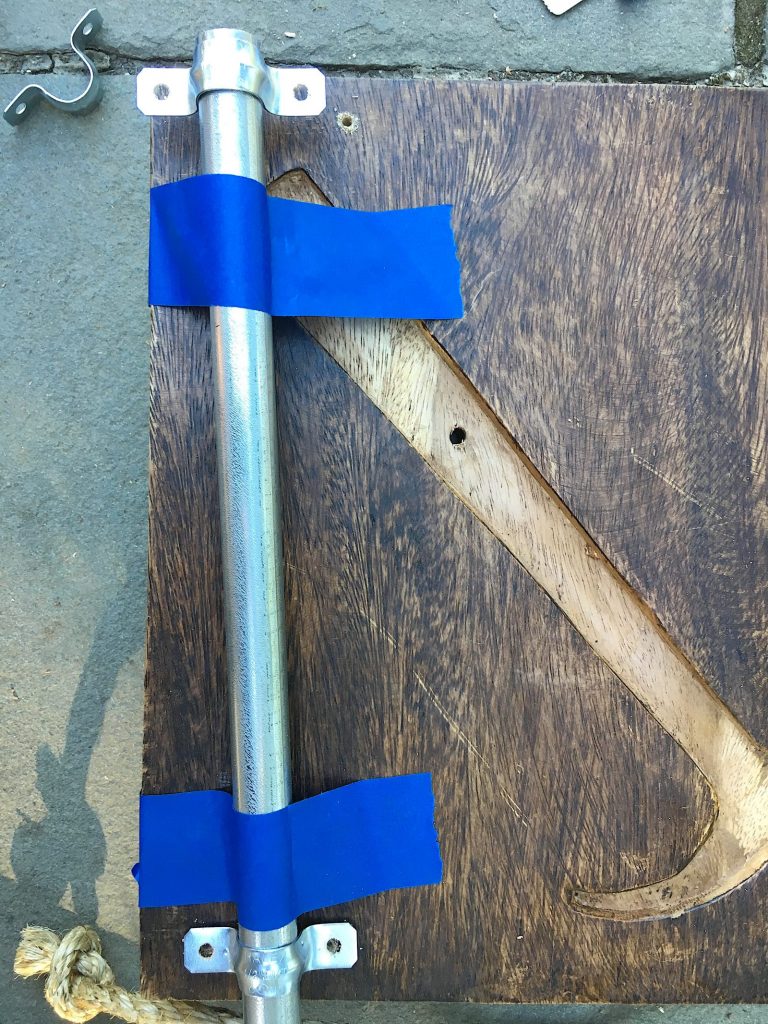
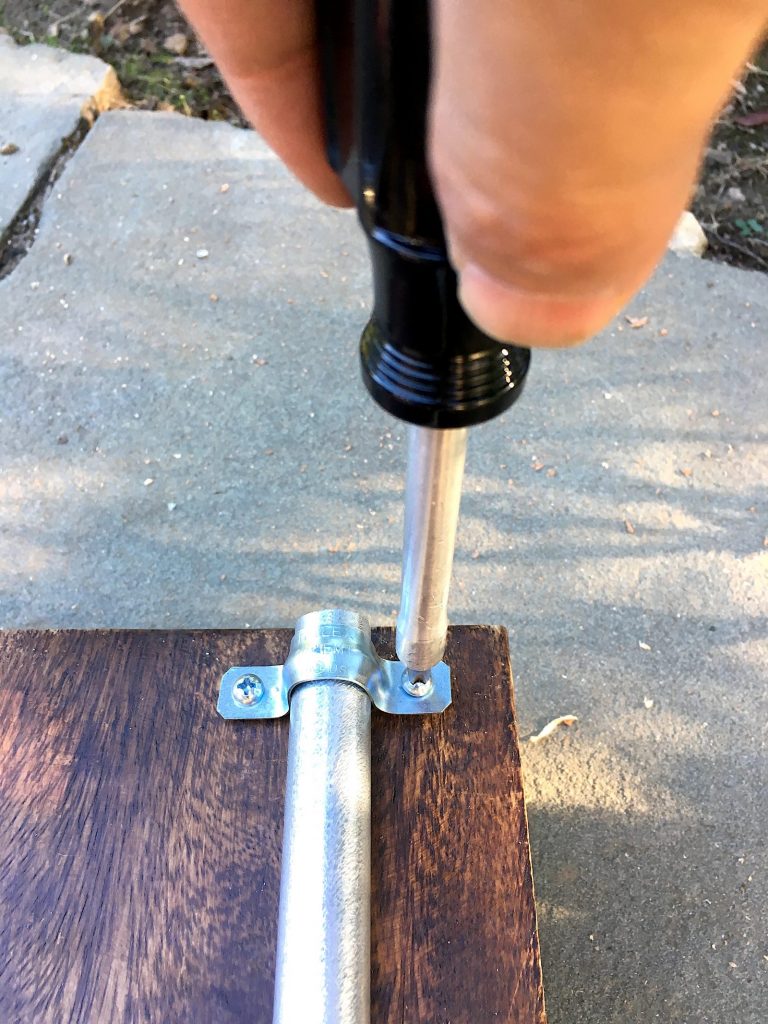
To attach the posts to the sign we needed some sort of clamp and screws. Conveniently, conduit is required (by code) to be attached firmly and so ready-made clamps are sold. We purchased a bag of 4 clamps sized perfectly for 1/2″ conduit. They don’t come with screws so a quick trip to the hardware section and we grabbed some #8 x 3/4″ length screws, two per clamp. We paid a bit extra for stainless steel screws since the sign will be outdoors.
One note on staking and conduit – if you decide to make a bigger sign, the 1/2″ conduit may look a bit skimpy as legs. There is a 3/4″ conduit available (with appropriate clamps) so consider keeping the staking in scale with your needs. The conduit is made of steel so its doubtful you’ll run into support issues regardless of what size you use. Keep in mind as you go up in conduit size, the pipe gets significantly heavier.
Sealer
The wood plaque we sourced was already waxed, but if you are making one from scratch, you will need to seal your finished plaque. Whether you paint or stain, seal it with an exterior-grade polyurethane to protect the wood from water damage. The metal conduit and clamps are likely galvanized but to ensure that we didn’t run into rust issues down the road (and to maintain the bare metal finish of the staking) we sprayed all parts with a thin coat of gloss clear Rustoleum enamel. That hopefully will ensure we don’t have surface rust showing up for a long while. Make sure you spray your screws – even stainless screws will rust over time with exposure to water. The house numbers don’t need to be sprayed as they are aluminum and have their own nickel finish.
Assembly
The wood plaque we bought really needed no prep. We decided to use the sign upside down from its original intent, to get the rope underneath. We originally were going to remove the two hanging screws and rope all together, so using it upside down would prevent water from entering through the original screw holes. Turns out the rope hanger ended up being a decorative touch so we left it attached.
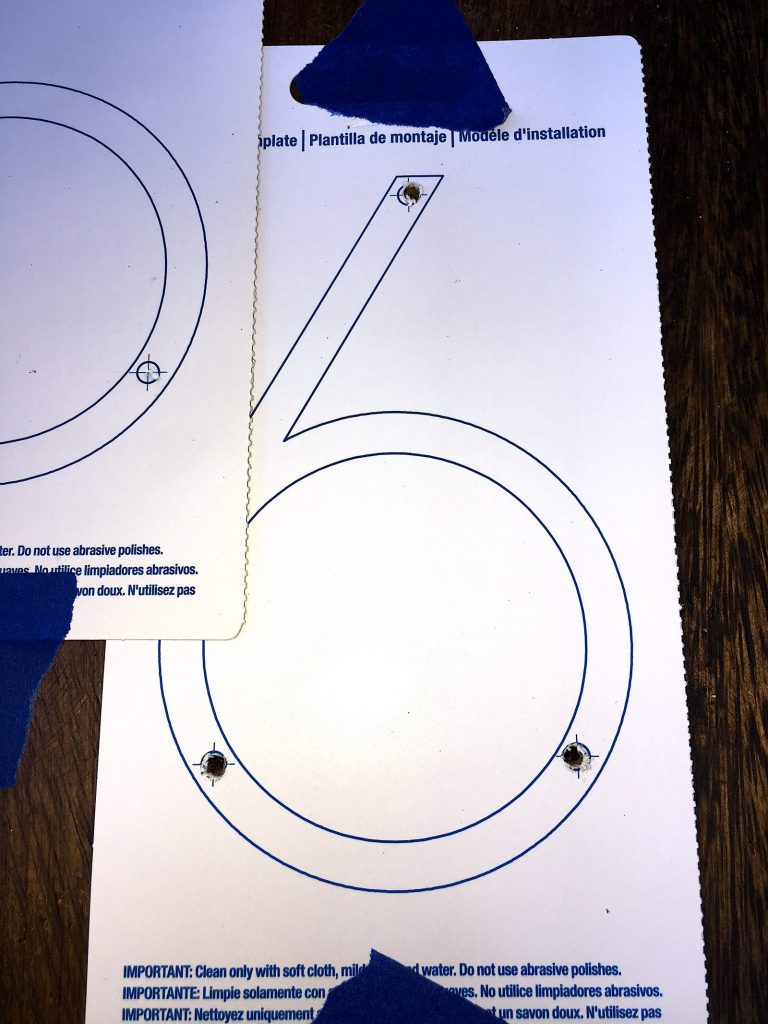
First step was to attach the numbers to the board. The numbers come conveniently with drilling templates and decent instructions. One tip (and one that applies to ALL manners of woodworking or whenever you are drilling holes) – if you’re not sure, ALWAYS drill a smaller hole first and check. Its much easier to enlarge a hole than it is to fix an oversized hole.
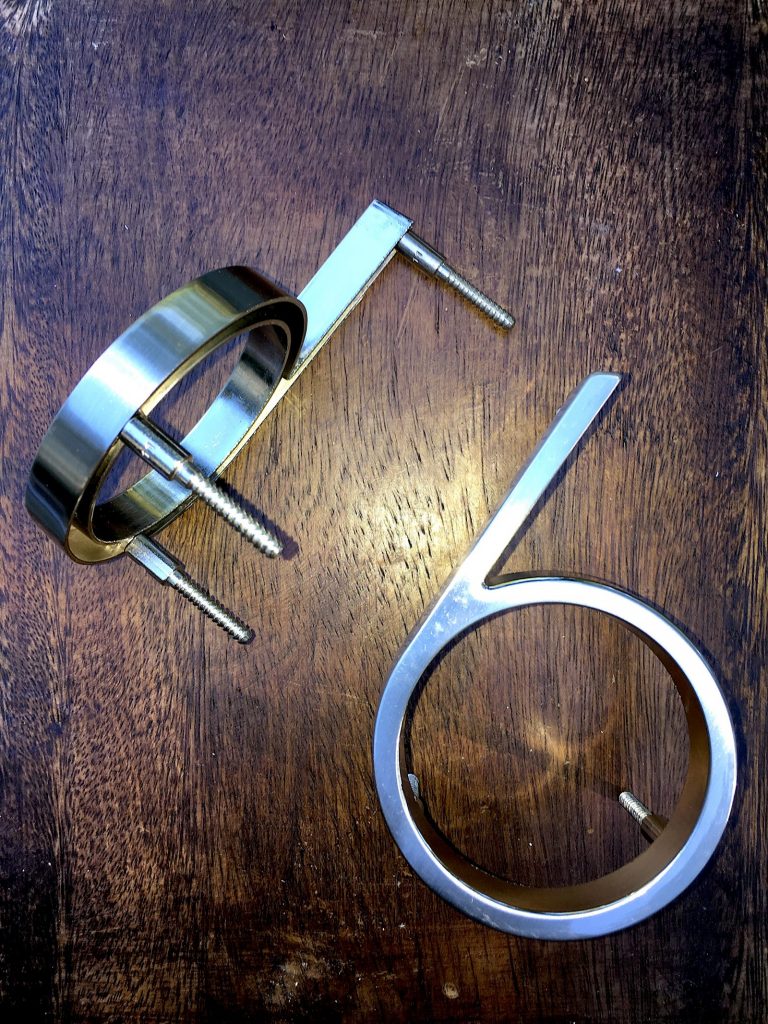
We screwed the posts into the numbers and tested them visually on the board. The sign looked a bit boring (probably because we only have two numbers in our address, and they happen to be the same number) when the numbers were side by side. So we offset them and we think it added just enough interest.
The numbers come with pre-printed cardboard templates that we taped in place to the board with paint masking tape. The templates show you where to drill the three holes per number. The recommended drill bit size looked a bit larger than the post and sure enough, after drilling the first hole and test-fitting, it was loose. We dropped down a drill bit size and it was a snug fit. Keep in mind, the instructions probably call for a slightly looser hole to provide some ‘give’ when fitting. Make sure you check where the posts line up with the template. We noticed the three posts that come with the numbers can be slightly bent, enough that after drilling 3 perfectly tight holes the posts may not fit easily. We had two posts that were off by about 1/16 to 1/8″ inch, so we accounted for that in the template. Again, check twice, drill once!
Our board was 2″ thick, so the required drill depth didn’t come through the board except in one place that unfortunately lined up perfectly with the carving in the back (thinner wood). That means you’ll be filling each hole with glue from the front.
A tip for drilling to the correct depth: they make special drill bits with ‘depth stoppers’ to ensure you only drill the needed amount. You can approximate this by measuring your drill bits from the end and adding a piece of masking tape wrapped tightly around the drill bit. This way you will know visually when drilling when you’ve reached your desired depth.
Before mounting the numbers permanently, we installed the posts first so that we wouldn’t mar the numbers by having to flip the sign on its face.
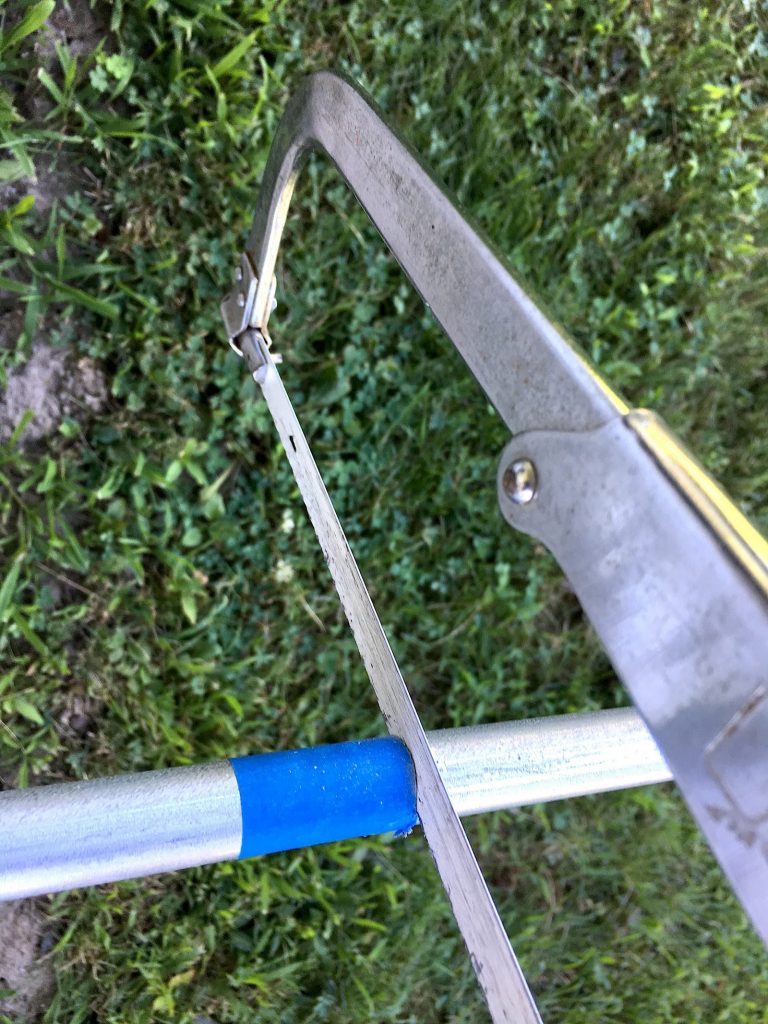
We lucked out by simply cutting the 5′ length of EMT conduit in half, giving us two 30″ lengths that left us enough pipe to anchor into the ground and leave approximately 12″ – 18″ above. A simple hacksaw with a metal blade will make quick work of the conduit. Make sure you cut over something to collect the fine metal shavings that you will create. Be careful with the final cut edges – they will be sharp. If you want to protect yourself, use some coarse sandpaper to remove the burrs before moving forward.
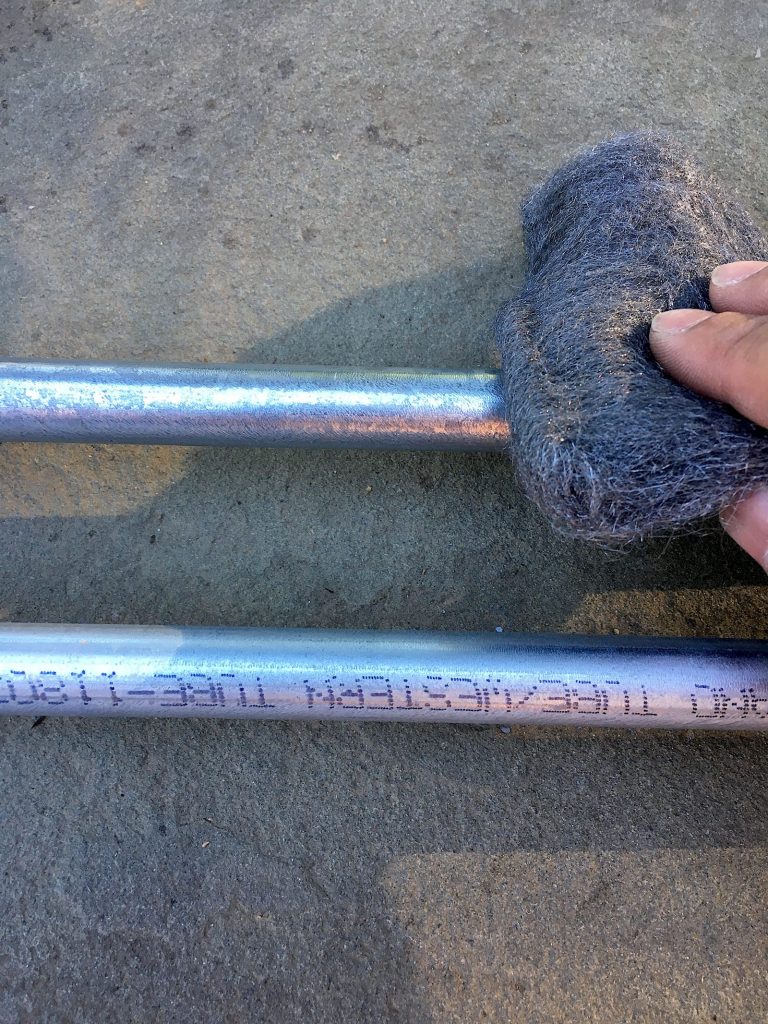
The conduit pipe happen to have some black lettering describing the type of pipe – to remove this we simply took some steel wool and polished off the lettering. It came off without much effort and buffed up the shine of the metal as well.
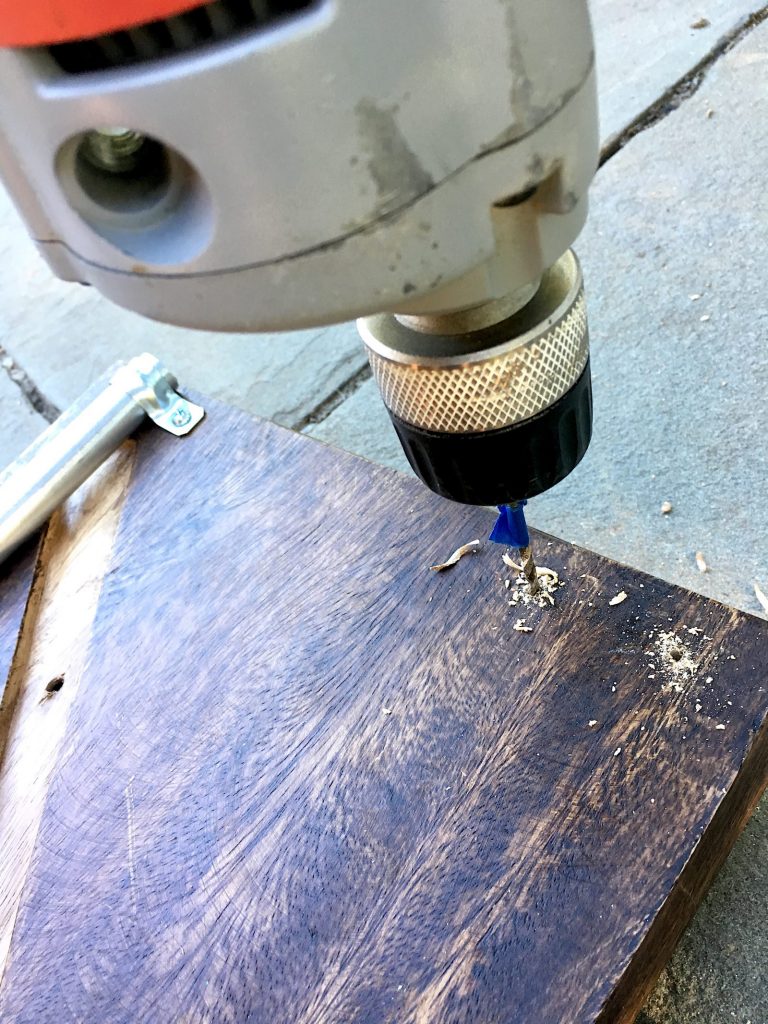
We simply attached the posts to the back side of our sign with two conduit clamps on the top and bottom of the sign, and kept the posts as far left and right as possible to stabilize the sign in the ground. We pre-drilled the holes to prevent splitting but depending on the wood you use, all you may need is a screwdriver.
Once the posts were securely installed, we flipped the sign back over and permanently mounted the numbers into their holes. We used a two-part epoxy glue as it is extremely strong, water resistant and good for filling gaps. Wood glue could work but with the overdrilled hole, we needed something that would dry hard and provide an anchoring for the post. We mixed the glue per the instructions, dribbled some into each post hole, carefully re-inserted the numbers and wiped away any excess. Careful with epoxy as it will harden like a rock and be visible if you’re sloppy. We clamped everything together with bar clamps to keep constant pressure for 24 hours until the glue set. Once dry, the epoxy is rock hard and water resistant. It also does a better job of joining two different materials like the metal posts and the wood base than typical wood glue or even super glues.
Staking the sign in place and a quick tension twist of the sisal rope (so it didn’t just hang down in a loop) was all it took to finish off the installation.
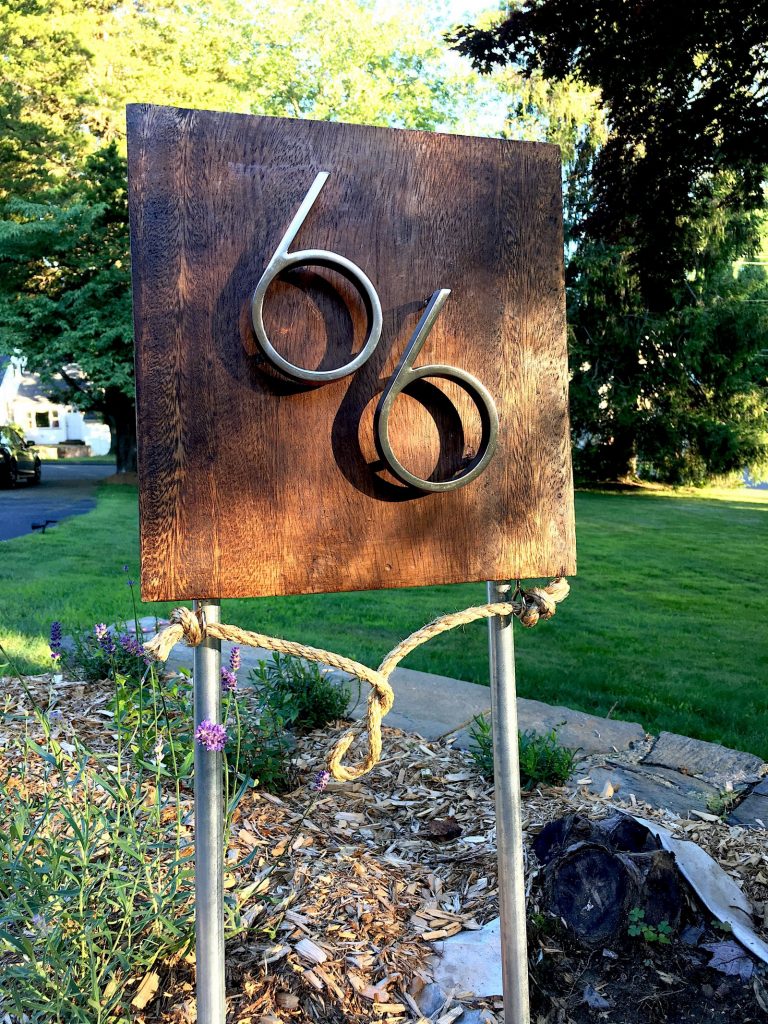
And there you have it, a sign that cost us less than $25 in parts and just a few hours to assemble!
If you are looking to make a house number sign that mounts directly on your house or other fixture, you can either create the hanging effect with eye screws and a length of knotted rope, or you can create keyhole mounts or use metal brackets on the back of the wood. This will allow you the flexibility of mounting to any flat surface.
Other easy modifications could be to use different color stains or paint a solid color, or use black or gold numbering if you prefer. Really, the only limit is your imagination. With the endless colors of spray paint and stain sealers, it’s easy to personalize this design to your exact needs. A quick spray of flat black enamel paint and the metal conduit pipes would look more like wrought iron.
Hopefully this inspires you to tackle your own address sign and customize your design to your own taste. Happy DIY! Let us know if you have questions or comments, or want to share your version of this project here…